WordPress Toolkit is a single management interface that enables you to easily install, configure, and manage WordPress. It is available if the WordPress Toolkit extension is installed in Plesk & cPanel.

Installing WordPress

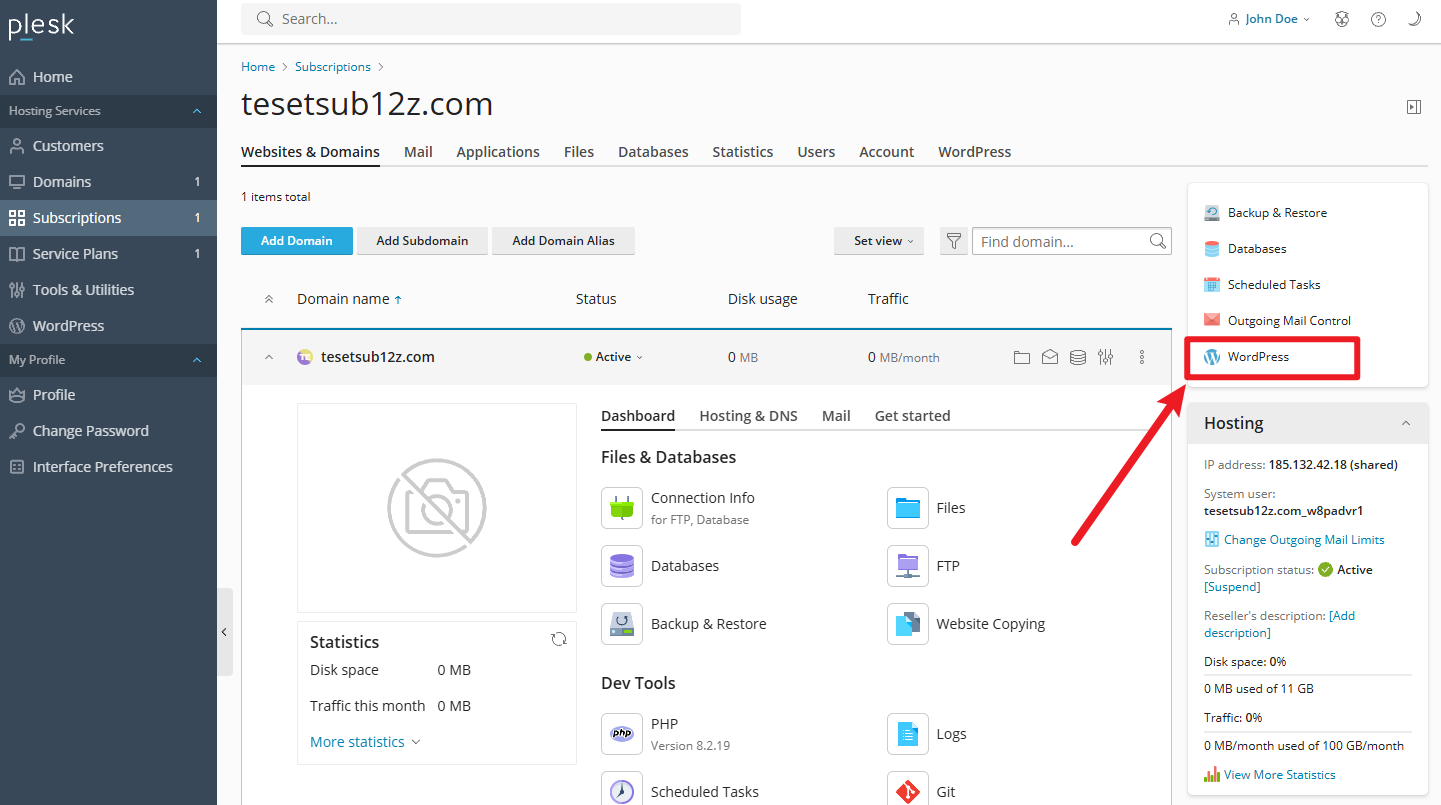
To install a new WordPress installation, go to WordPress and click Install.

Here you can:

Install the latest version of WordPress with the default settings by clicking Install.

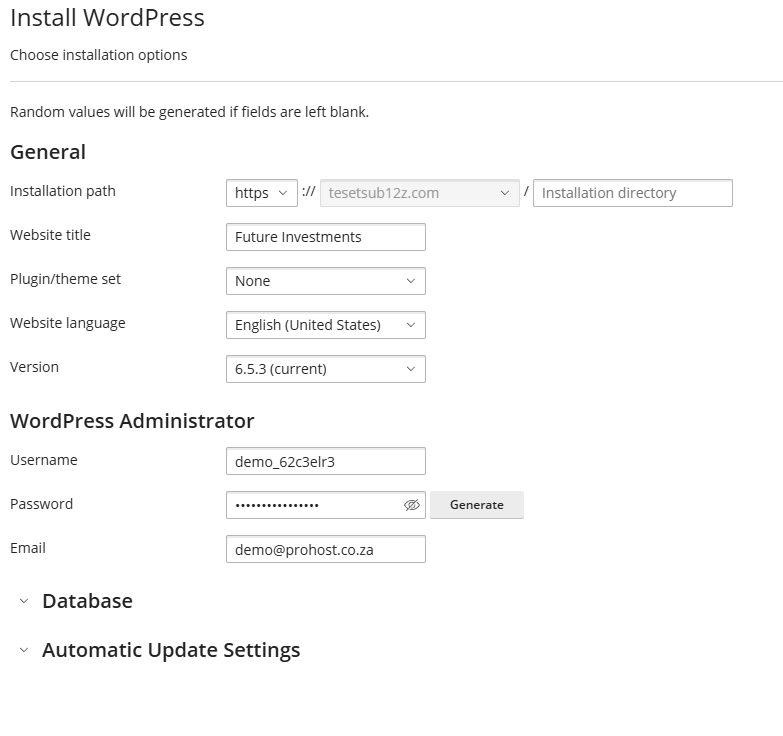
Change the default settings (including the desired WordPress version, the database name, the auto-update settings, and more) and then click Install.
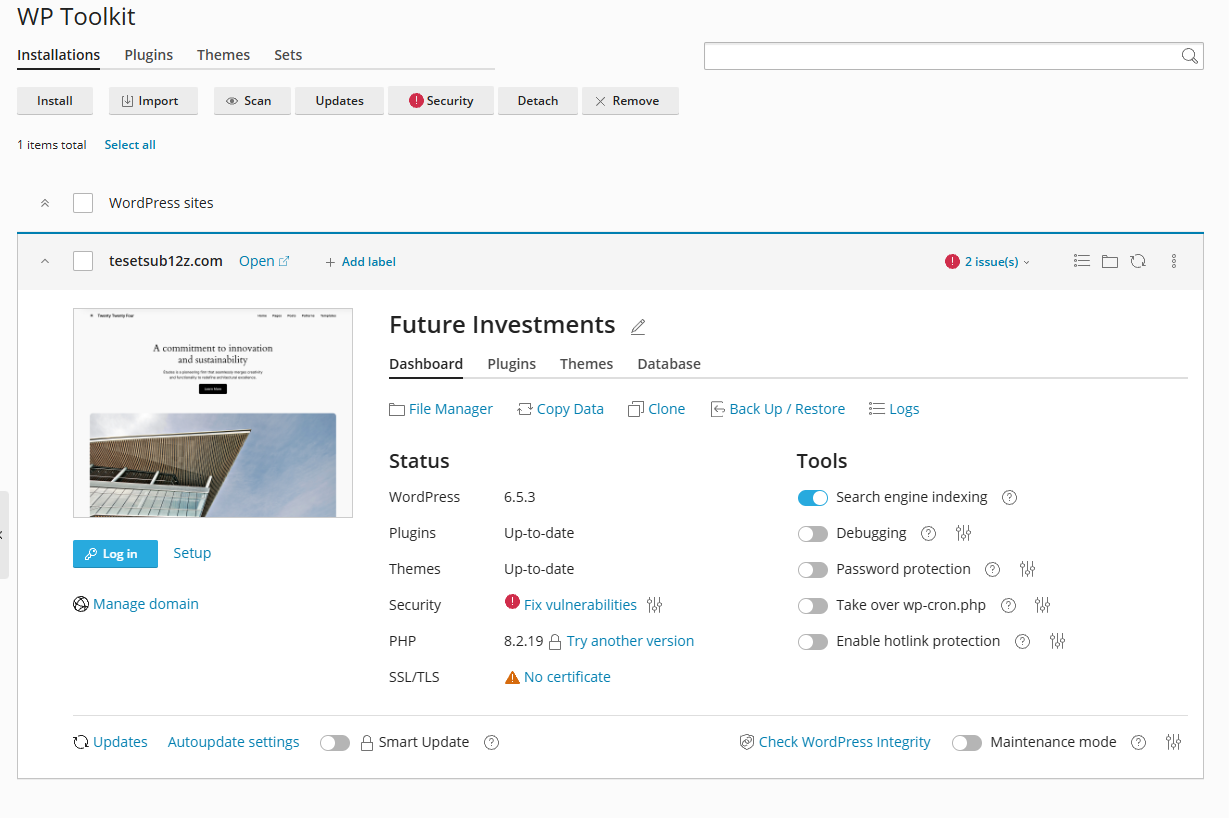
A new installation appears in the list of all existing WordPress installations in WordPress.

Adding existing WordPress Installations to WordPress Toolkit
All WordPress installations added using the WordPress Toolkit or through the Applications page appear in WordPress Toolkit automatically; those installed manually need to be attached to WordPress Toolkit. If you have upgraded from an earlier version of Plesk and you used WordPress, we recommend that you attach all existing WordPress installations to WordPress Toolkit.

To attach WordPress installations to WordPress Toolkit:

Go to WordPress.
Click Scan.
The WordPress installation was attached and is now shown in the list of existing WordPress installations in WordPress.

Importing WordPress Installations

You can use the “Web Site Migration” feature to migrate WordPress websites owned by you but hosted elsewhere to Plesk. When you migrate a WordPress website, Plesk copies all its files and the database to your server. Once a website has been migrated, you can manage it using WordPress Toolkit.

Managing WordPress Installations

Go to WordPress to see all your WordPress installations.

WordPress Toolkit groups information about each installation in blocks we call cards.

A card shows a screenshot of your website and features a number of controls that give you easy access to frequently used tools. The screenshot changes in real-time to reflect the changes you make to your website. For example, if you turn on maintenance mode or change the WordPress theme, the screenshot of the website will change immediately.

When you move the mouse cursor over the screenshot of the website, you’ll see the following:

Open Website button. To open the website in a new browser tab, click the button.
Date and time the screenshot was updated last time. To update the screenshot right away, in the upper-right corner of the screenshot, click the image icon WPT refresh screenshot icon.
Here you can also do the following:

Change your website name. To do so, click the image icon pencil icon, give your website a name, and then click the image icon tick.

Log in to WordPress as an administrator. To do so, click Log in below the website screenshot.

Change general WordPress settings. To do so, click “Setup” next to Log in.

Go to the domain’s screen in Websites & Domains. To do so, click Manage domain below the website screenshot.

Status

WordPress websites are frequently targeted by hackers. Outdated WordPress core, plugins, and themes also pose a security risk.

In the “Status” section, you can do the following:

See if WordPress core as well as installed plugins and themes are up to date and update them if necessary.
See if SSL/TLS support is enabled and, if not, enable it.
See how safe is your website and enhance its security.

The controls in the “Tools” section give you easy access to the following settings and tools:

“Search engine indexing” shows your website in search results of search engines.

“Debugging” helps you debug a website that is not ready for viewing and being tested or developed.

“Password Protection” specifies the password you will use to log in to WordPress from Plesk.

“Take over wp-cron.php” helps you set up a regular run of wp-cron.php.

Above the “Status” and “Tools” sections, you find the following WordPress Toolkit features:

“File Manager” to manage the website’s files in File Manager.

“Copy Data” to copy the content of your website to another.

“Clone” to make a full copy of your website.

“Back Up / Restore” to create a backup of your website and restore it if necessary.

“Logs” to view WordPress Toolkit logs of the installation you need to troubleshoot.
At the bottom of the website card, you can do the following:

Install updates and configure auto-updates.

Enable Smart Update, a premium feature, which helps you keep your production websites up to date without the risk of breaking them.

Turn on “Maintenance mode”, which hides your website’s content from visitors.

On the remaining three tabs you can manage the installation’s plugins, themes, and change the database username and password.

Website Labels
Website labels are preconfigured identifiers that you can give to your websites (for example, “staging”, “production”, “testing”, and so on).

Depending on your project, it might be necessary to host multiple copies of a website for various purposes. Labels will help you distinguish one website from another.

By default, a website has no label. To label, it, click ADD LABEL (on the website card next to the website name) and select the desired label. Labels are optional and you can change or remove a label at any time.

Managing Cards View
You can choose the way WordPress Toolkit shows cards. The default “Cards” view is best suited for a small number of installations. If you have a large number of installations, collapse icon.

You can also Filter installations to manage them easier.

Removing and Detaching Installations
You can detach WordPress installations that you do not want to see and manage in WordPress Toolkit. Detaching does not remove the installation, merely hides it from WordPress Toolkit. A detached installation will be attached to WordPress Toolkit again after you scan for WordPress installations. You can detach WordPress installations individually or multiple installations at a time.

To detach WordPress installations:

Go to WordPress and then do the following:
(To detach an individual installation) On the card of the installation, you want to detach, click the icon.
(To detach multiple installations) Select installations you want to detach and click Detach.
Click Detach.
Unlike detaching, removal completely deletes a WordPress installation. You can remove any installation, no matter how it was installed: using WordPress Toolkit, through the Applications page, or manually. You can remove WordPress installations individually or multiple installations at a time.

To remove WordPress installations:

Go to WordPress and then do the following:
(To remove an individual installation) On the card of the installation, you want to remove, click the icon.
(To remove multiple installations) Select installations you want to remove and click Remove.
Click Remove.

Search Engine Indexing and Debugging
By default, a newly created WordPress Toolkit website is shown in search results of search engines. If your website is not yet ready for public viewing, turn off “Search engine indexing”.

If you are installing WordPress for testing or development, you can enable “Debugging” to automatically find and fix errors in the website code. To do so, click the image tune icon next to “Debugging”, select the WordPress debugging tools you want to activate, and then click OK.

Updating WordPress Installations
To keep your website secure, you need to regularly update the WordPress core, as well as any installed plugins and themes. You can do this either automatically or manually:

Manual updates give you control over when updates are installed. For example, you can wait and see if installing a particular update caused issues for other WordPress users. However, you need to remember to update regularly to avoid falling behind.
Auto updates give you peace of mind by keeping your WordPress installation up to date. However, updates can sometimes break your installation, and with auto-updates, you may not learn about it right away.
For security reasons, we recommend that you configure auto-updates.

To update a WordPress installation manually:

Go to WordPress. If your WordPress installation needs updating, you will see the corresponding messages in the “Status” section (for example, “Install plugin updates”).

Click any message about available updates, wait for WordPress Toolkit to load the list of available updates, and then select the updates you want to install.

Click Update.

The selected updates will be applied.

Although WordPress Toolkit regularly checks for updates itself, you can also check for updates at any time. To do so, click “Check updates”.

To configure auto-updates for a WordPress installation:

Go to WordPress and choose the WordPress installation that you want to update automatically and then, on the installation card, click “Autoupdate settings”.

Choose the desired auto-update settings. You can configure auto-updates separately for WordPress core, plugins, and themes (for example, you can choose to enable auto-updates for plugins and themes, but not for WordPress core). Follow these recommendations:

Selecting “No” next to “Update WordPress automatically” turns off auto-updates of WordPress core. This is insecure.
If your website is publicly available (production) and you are concerned that applying updates automatically may break it, select “Yes, but only minor (security) updates”.
If your website is a non-public (staging) version of a WordPress website, select “Yes, all (minor and major) updates”. This will keep your staging website up to date and ensure that should an update break something, it happens to the staging website and not to the production one.
Click OK.

If you are concerned that WordPress auto-updates may break your website, use Smart Updates. With Smart Updates, WordPress installations are always updated safely without breaking your website.


Backing up and Restoring WordPress Installations

To help prevent data loss, you can back up and restore websites. To do so, you can use either the WordPress Toolkit feature or the general Plesk backup mechanism, called Backup Manager.

Creating backups in WordPress Toolkit may be more convenient than in Backup Manager because of the following reasons:

WordPress Toolkit backs up an individual website, while Backup Manager backs up the whole subscription with all the subscription’s websites and their data.
If you need to back up an individual website, a WordPress Toolkit backup requires less time and disk space.
Creating backups in WordPress Toolkit does not require any setup.
To back up a WordPress website:

Go to WordPress and then click Back up / Restore on the card of the WordPress installation you want to back up.

Click Back up.

Once the backup is finished, it will be displayed in the list of WordPress Toolkit backups.

To restore a WordPress website:

Go to WordPress and then click Back up / Restore on the card of the WordPress installation whose backup you want to restore.

Click the image icon restore icon corresponding to the backup you want to restore.

Click Restore.

You have restored your backup.

To be on the safe side, you may want to download WordPress Toolkit backup files to store them elsewhere.

To download WordPress Toolkit backup files:

Go to WordPress and then click Back up / Restore on the card of the WordPress installation whose backup files you want to download.

Click the image icon download icon corresponding to the backup whose file you want to download.

You will be redirected to the directory in File Manager (/WordPress-backups in the website’s home directory) where WordPress Toolkit backups are stored.

Click the image icon hamburger icon corresponding to the backup file you want to download and then click Download.

You have downloaded a backup file.

You can delete WordPress Toolkit backups you no longer need.

To delete a WordPress Toolkit backup:

Go to WordPress and then click Back up/Restore on the card of the WordPress installation whose backup file you want to delete.
Click the icon corresponding to the backup you want to delete and then click Delete.
You have deleted a backup.


Managing Plugins

A WordPress plugin is a type of third-party software that adds new functionality to WordPress. With WordPress Toolkit, you can install and manage plugins on one or more WordPress installations.

Installing Plugins

In WordPress Toolkit, you can install plugins on one or all WordPress installations of the subscription. You can:

Search for and install plugins found in the wordpress.org plugins repository.
Install plugins uploaded by the Plesk administrator.
Upload custom plugins, which is useful if you can not find a suitable plugin in the wordpress.org repository or if you need to install your own plugin.
To install plugins on a particular WordPress installation:

Go to WordPress, go to the “Plugins” tab of an installation card, and then click Install.

Search for plugins, and then click Install next to the plugin you want to install. Installed plugins are activated immediately.

To install plugins on all WordPress installations of the subscription:

Select the desired subscription.

Go to WordPress > the “Plugins” tab, and then click Install.

Search for plugins, select the plugins you want to install, and then click Select websites.

By default, newly installed plugins are activated immediately. You can prevent this by clearing the “Activate after installation” checkbox.

Select websites on which you want to install plugins and then click Install.

To install plugins uploaded by the Plesk administrator:

Go to WordPress > the “Plugins” tab.

Click Install next to a plugin marked with the icon. If you see no such icons, it means that the Plesk administrator has not uploaded any plugins.

Select the WordPress installations on which you want to install the plugin.

By default, installed plugins uploaded by the Plesk administrator are activated immediately. You can prevent this by clearing the “Activate after installation” checkbox.

Click Install.

To upload a plugin:

Select the desired subscription.

Go to WordPress > the “Plugins” tab, and then click Upload plugin.

Click Browse… and browse to the location of the ZIP file containing the plugin you want to upload.

Select the WordPress installations on which you want to install the plugin.

By default, a newly uploaded plugin is not activated. You can activate it by selecting the “Activate after installation” checkbox.

Click OK.

Activating and Deactivating Plugins
You can activate or deactivate plugins installed on a particular installation or on all installations belonging to a subscription at once.

To activate or deactivate plugins for a particular installation:

Go to WordPress, and then go to the “Plugins” tab of an installation card.

Under “State”, turn on or turn off a plugin to activate or deactivate it, respectively.

To activate or deactivate plugins for all installations of the subscription:

Select the desired subscription.
Go to WordPress > the “Plugins” tab.
Select the plugin you want to activate or deactivate.
Click Activate or Deactivate.

Updating Plugins
If a plugin needs updating, you will see “Updates” next to the plugin on the “Plugins” tab of an installation card. You can update not only free plugins but also paid ones if they can be updated in the usual way in the WordPress admin dashboard.

You can do the following:

Update plugins for one particular installation. Read how to do so in the “To update a WordPress installation manually” procedure.
Update plugins installed on all installations of the subscription.
Configure auto-updates for plugins. Read how to do so in the “To configure auto-updates for a WordPress installation” procedure.
To update plugins on all installations of the subscription:

Select the desired subscription.

Go to WordPress > the “Plugins” tab.

Click “Update to version …” next to the plugin you want to update. To learn more about the update, click “Changelog”. This will take you to the plugin’s page on wordpress.org.

Click Yes.

Removing Plugins
You can remove plugins from a particular installation or from all installations belonging to a subscription at once.

To remove plugins from a particular installation:

Go to WordPress, and then go to the “Plugins” tab of an installation card.
To remove one plugin, click the image 79517 icon corresponding to the plugin you want to remove. To remove several plugins, select them and click Remove.
Click Yes.
To remove plugins from all installations of the subscription:

Select the desired subscription.
Go to WordPress > the “Plugins” tab.
Select the plugins you want to remove, click Uninstall, and then click Yes.


Managing Themes

A WordPress theme determines the overall design of your website including colours, fonts, and layout. By selecting a different theme, you change the look and feel of your website without changing the content. With WordPress Toolkit, you can install and manage themes.

Installing Themes
In WordPress Toolkit, you can install themes on one or all WordPress installations of the subscription. You can:

Search for and install themes found in the wordpress.org themes repository.
Install themes uploaded by the Plesk administrator.
Upload custom themes, which is useful if you cannot find a suitable theme in the wordpress.org repository or if you need to install your own theme.
To install themes on a particular WordPress installation:

Go to WordPress, go to the “Themes” tab of an installation card, and then click Install.

Search for themes, and then click Install next to the theme you want to install. By default, a newly installed theme is not activated.

To install themes on all WordPress installations of the subscription:

Select the desired subscription.

Go to WordPress > the “Themes” tab, and then click Install.

Search for themes, select the themes you want to install, and then click Select websites.

Select websites on which you want to install themes and then click Install.

To install themes uploaded by the Plesk administrator:

Go to WordPress > the “Themes” tab.
Click Install next to a theme marked with the icon. If you see no such icons, it means that the Plesk administrator has not uploaded any themes.
Select the WordPress installations on which you want to install the theme.
By default, installed themes uploaded by the Plesk administrator are activated immediately. You can prevent this by clearing the “Activate after installation” checkbox.
Click Install.
To upload a theme:

Select the desired subscription.

Go to WordPress > the “Themes” tab, and then click Upload theme.

Click Browse… and browse to the location of the ZIP file containing the theme you want to upload.

Select the WordPress installations on which you want to install the theme.

By default, a newly uploaded theme is not activated. To activate it, select the “Activate after installation” checkbox.

Click OK.

To install an uploaded theme:

Go to WordPress > the “Themes” tab.

Click Install next to a theme you have uploaded.

Select the WordPress installations on which you want to install the uploaded theme.

By default, a newly uploaded theme is activated. To prevent this, clear the “Activate after installation” checkbox.

Click Install.

Activating a Theme
You can activate a theme installed on a particular installation or on all installations of the subscription. A WordPress installation can have only one active theme at a time.

To activate a theme for a particular installation:

Go to WordPress, and then go to the “Themes” tab of an installation card.
Under “State”, turn on a theme to activate it. The theme that was previously active will be automatically deactivated.
To activate a theme for all installations of the subscription:

Go to WordPress > the “Themes” tab.

Click Activate next to a theme you want to activate.

Updating Themes

If a theme needs updating, you will see “Updates” next to the theme on the “Themes” tab of an installation card. You can update not only free themes but also paid ones if they can be updated in the usual way in the WordPress admin dashboard.

You can do the following:

Update themes for one particular installation. Read how to do so in the “To update a WordPress installation manually” procedure.
Update themes installed on multiple installations.
Configure auto-updates for themes. Read how to do so in the “To configure auto-updates for a WordPress installation” procedure.
To update themes on multiple installations:

Go to WordPress > the “Themes” tab.
Click “Update to version …” next to the theme you want to update. To learn more about the update, click “Changelog”. This will take you to the theme’s page on wordpress.org.
Click Yes.
Removing Themes
You can remove themes from a particular installation or from all installations belonging to a subscription.

To remove themes from a particular installation:

Go to WordPress, and then go to the “Themes” tab of an installation card.
Click the icon next to the theme you want to remove. To remove several themes, select them and click Remove.
Click Yes.
To remove themes from all installations of the subscription:

Go to WordPress > the “Themes” tab.
Select the themes you want to remove, click Uninstall, and then click Yes.


Securing WordPress
WordPress Toolkit can enhance the security of WordPress installations (for example, by turning off XML-RPC pingbacks, checking the security of the wp-content folder, and so on).

We call individual improvements you can make to the installation’s security “measures”. We consider certain measures to be critical. For that reason, WordPress Toolkit applies them automatically to all newly created installations.

On the installation’s card next to “Security”, you can see the following security messages:

“Fix security” means that not all critical security measures were applied.
We strongly recommend that you apply them all.
“Check security” means that all critical security measures were applied,
while some recommended measures were not.
“View settings” means that all security measures (critical and recommended) were applied.

You can secure WordPress installations individually or multiple installations at a time.

To secure an individual WordPress installation:

Go to WordPress, choose the installation you want to secure, and then, on the installation card, click the message next to “Security” (for example, “Fix security”).
Wait for WordPress Toolkit to display the security measures you can apply.
Select the security measures you want to apply, and then click Secure.
All selected measures will be applied.

To secure multiple WordPress installations:

Go to WordPress and then click Security.
You will see the list of your WordPress installations. For every installation, you can see how many critical (indicated by the image 79670 icon) and recommended (the image 79671 icon) security measures can be applied to it. To see the list of measures that can be applied, click the corresponding icon. If all security measures are applied, you will see the image 79672 icon instead.
(Optional) To see more information about all security measures and to manage them for an individual WordPress installation, click image 79673 next to the desired installation. To return to managing security of multiple installations, click next to “Security Status Of Selected Websites”.
Select installations to which you want to apply security measures and then click Secure.
By default, only critical security measures are selected to be applied. You can also select:
Security measures of your choice. To do so, click the “Custom selection” radio button.
All security measures at once. To do so, click the “All (critical and recommended)” radio button.
Click Secure.
The selected measures will be applied.

Reverting Security Measures
In rare cases, applying security measures can break your website. In this case, you can revert the security measures you have applied. You can do this for an individual WordPress installation or for multiple WordPress installations at a time.

To revert applied security measures for an individual installation:

Go to WordPress, choose the installation for which you want to revert an applied measure, and then click the message (for example, “Check security”) next to “Security” on the installation card.

Wait for WordPress Toolkit to display the list of security measures.

Select the security measures you want to revert and then click Revert.

The applied security measures will be reverted.

To revert applied security measures for multiple installations:

Go to WordPress and then click Security.

You will see the list of your WordPress installations and whether critical and recommended security measures were applied to them or not.
(Optional) To see more information about all security measures and to manage them for an individual WordPress installation, click next to the desired installation. To return to managing security of multiple installations, click next to “Security Status Of Selected Websites”.
Select installations for which you want to revert security measures and then click Revert.
Select security measures you want to revert and then click Revert.
The applied security measures will be reverted.


Cloning a WordPress Website

Cloning a WordPress website involves the creation of a full website copy with all website files, database, and settings.

You may want to clone your WordPress website in one of the following situations:

You maintain a non-public (staging) version of a WordPress website on a separate domain or subdomain, and you want to publish it to a production domain to make it publicly available.
You have a publicly available (production) WordPress website and you want to create a non-public (staging) copy of it, to which you can make changes without affecting the production website.
You want to create a “master” copy of a WordPress website with preconfigured settings, plugins, and theme, and then clone it to start a new development project for a client.
You want to create multiple copies of a WordPress website and make different changes to each one (for example, to show them to a client so that he or she can choose the one he or she likes best).
Clone a WordPress website:

Go to WordPress and then click “Clone” on the card of the WordPress installation you want to clone.

Choose the target where to clone the website:

Keep “Create subdomain” to have WordPress Toolkit create a new subdomain with the default “staging” prefix. You can use it or type in the desired subdomain prefix.
Select “Use existing domain or subdomain” and then select the desired domain or subdomain from the list.

  1. (Optional) Change the name of the database automatically created during cloning.

  2. When you are satisfied with the selected target and the database name, click Start.

When the cloning is finished, the new clone will be displayed in the list of WordPress installations.


Copying Data from One WordPress Website to Another

You can copy the content of your WordPress website including files and database to another WordPress website.

Let us say you maintain a non-public (staging) version of a WordPress website on a separate domain or subdomain and a publicly available (production) version of this website on a production domain. You may want to copy data from one website to another in the following situations:

You want to copy the changes you have made to the staging version to the production version.
You want to copy the data from the production website to the staging website to see how the changes (for example, a new plugin) work with the production data. After checking that everything works fine, you may copy your changes to your production website.
You have made some changes (for example, installed a new plugin) to the staging website, and these changes resulted in new tables being added to the database. You want to copy only these tables to the production website without affecting other data.
You have upgraded the staging website to a newly released version of WordPress and fixed the post-upgrade issues (if any). You now want to push these changes to the production website.
You can choose to copy the WordPress files, the WordPress database, or both the files and the database. When copying the database, you can choose to copy all tables, or tables that are present on the source but absent from the target, or you can specify individual database tables to be copied.
When performing the copying, keep in mind the following:

The selected data are copied from the source website to the target website. Any files and/or database tables present both on the source and the target that are not identical are copied from the source to the target. Files and database tables present only on the target are not affected unless you select the “Remove missing files” option during copying.
During copying, the target website enters maintenance mode and becomes temporarily unavailable.
If the WordPress version on the target website is earlier than on the source website, WordPress Toolkit first upgrades WordPress on the target website to match the version installed on the source website, and then runs copying.
If the WordPress version on the source website is earlier than on the target website, copying is aborted. To copy data, you need to upgrade WordPress on the source to the version installed on the target or a later version.
If the database prefix on the source and the target differs, WordPress Toolkit will change the database prefix on the target website to match that on the source during copying.
Copying of data between a regular WordPress installation and a multisite one is not supported. We recommend that you use cloning instead.
Note: During copying, files and database tables copied from the source overwrite those present on the target. Any changes made to the files and database tables on the target prior to copying will be discarded and lost without warning.

Note: If you have caching plugins installed on a WordPress website you want to copy from, clear the cache on the source website before copying. Otherwise, the target website might work incorrectly.

To copy data of one WordPress website to another:

Go to WordPress and then click Copy Data on the card of the WordPress installation which data you want to copy.

Next to “Target”, select the target WordPress installation (under the same or another subscription) you want to copy the data to.

Under “Data to Copy”, select which data you want to copy to the target WordPress website:

“Files Only” - copies only the website files, including the WordPress core files and the files related to themes and plugins.

Note: By default, the htaccess, web.config, and wp-config.php files are not copied because modifying these files may disrupt the operation of WordPress.

Note: The Plesk administrator can make the “Copy wp-config.php” checkbox visible to you. In this case, even if you choose to copy the wp-config.php file, the information related to the database will not be copied. This prevents the target WordPress installation from corruption. Custom settings specified in the wp-config.php file on the target will be overwritten with those from the source.

“Database Only” - copies only the database. You can select to import all, new, or selected database tables (for details, see step 5 below).

“Files and Database” - copies both the website files and the database. You can choose to import all, new, or selected database tables (for details, see step 5 below).

If you selected “Files Only” or “Files and Database” during step 3, two more options become available (unless the Plesk administrator did not hide them):

“Replace files modified on target” - by default, if a file with the same name exists both on the source and the target, the file from the source will be copied and will replace the file on the target even if the source file is older. To prohibit overwriting files on the target with the files from the source that are older clear the checkbox.
“Remove missing files” - by default, if a file exists on the target but is missing from the source, the file is untouched. Select this checkbox to remove files on the target that are missing from the source.
If you selected “Database only” or “Files and Database” during step 3, select which database tables you want to copy:

“All Tables” (the default option). If you want to copy all changes except for pages, posts, and users, keep the “Except: _postmeta, _posts, _usermeta, _users” checkbox selected.
New tables only
Selected tables. Click “Select tables to copy”, select those tables you want to copy, and then click Select.
Before copying data, WordPress Toolkit suggests creating a restore point. You can use it to roll back the changes made during copying. If you do not want to create a restore point, clear the “Create a restore point” checkbox. Learn how you can recover your WordPress installation using the restore point in the “Restoring a WordPress Installation” section below.

Note: Every WordPress installation can only have a single restore point. Creating a restore point overwrites the existing restore point if any.

When you are satisfied with the selected options, click Start to start copying data.


Restoring a WordPress Installation

When you update the WordPress core or copy data from one WordPress installation to another, WordPress Toolkit suggests creating a restore point before beginning the operation. If you are not happy with the results, you can use the restore point to roll back the changes and restore your installation to the state it was in before the operation.

Note: WordPress Toolkit suggests creating a restore point only when you update a single WordPress installation.

Making Full Restore Points
By default, a restore point contains only the data that will be affected when copying data or updating. However, the Plesk administrator can set up WordPress to include all the target installation data, both files and the database, in the restore point. Full restore points provide the maximum chances of successful recovery but take longer to create and take up more disk space than regular restore points.

To restore a WordPress installation from a restore point:

Go to WordPress and find the card of an installation you want to restore.

Click the image restore icon next to “Restore Point” and then click Continue.

The restoration will begin. Your installation will be restored to the state it was in before the operation.

The restore point takes up disk space which is included in your allowed disk space quota. After you have restored your WordPress installation, or once you have determined that all is good and there is no need to restore, you can delete the restore point.

To delete a restore point:

Go to WordPress and find the restore point you want to delete.
Click the icon next to “Restore Point”, and then click Remove.
Note: Every WordPress installation can only have a single restore point. Creating a restore point overwrites the existing restore point if any.

It is important to note that a restore point is not the same as a backup. Making any changes to the target installation after you copy data or update it may make restoring from the restore point impossible. If you are copying data or updating a live production WordPress installation, we recommend that you back it up beforehand in addition to creating a restore point.


Updating a Website URL

If you have moved a website from a different server, the website URL may change. In this case, your migrated WordPress installation will not work until the website URL is updated in WordPress. Previously, you had to do this manually. Now WordPress Toolkit can update the website URL automatically.

To update the website URL:

Go to WordPress, choose the card of the website that you have migrated, click the button, and then click Update Site URL.
WordPress Toolkit compares the actual website URL with the one specified in the WordPress database and in wp-config.php:
If the URLs match, then your website URL is up to date. Click Back to return to the website card.
If the URLs do not match, replace the URL specified in WordPress with the actual URL by clicking Update.
You have ensured that your website is online.


Protecting a Website with a Password
You can set a password to protect access to your WordPress website. Anyone visiting a password-protected website must enter a valid username and password to view the website content.

Password protection is useful in the following cases:

The website is under development and you do not want anyone else to see it.
You want to show a demo version of the website only to certain visitors.
To protect a WordPress website with a password:

Go to WordPress, choose the installation you want to protect with a password, and then turn on “Password protection”.
Create or generate a password. If desired, you can also change the username (the installation’s administrator username is used by default).
Click Protect.
To disable “Password protection”, turn it off.


Setting up a Regular Run of wp-cron.php
The wp-cron.php file is a virtual cron job (or scheduled task) WordPress uses to automate certain operations, for example, checking for plugins or themes updates, sending email notifications, and so on. By default, WordPress runs the wp-cron.php task every time someone visits your website. If you want WordPress operations to be performed regularly and on schedule, you need to disable the default wp-cron.php execution.

If your website has high traffic, scheduled wp-cron.php execution may also improve the website load time.

To disable wp-cron.php on a particular WordPress installation:

Go to WordPress and choose the WordPress installation for which you want to disable the default wp-cron.php execution.

Turn on “Take over wp-cron.php” on the installation card.

The default wp-cron.php execution is now disabled.

By default, WordPress Toolkit automatically creates a replacement scheduled task. It will now run wp-cron.php every 30 minutes.

In the following cases, you may not need a replacement task:

You already have or planning to have your own replacement task.
You do not need any replacement task because running wp-cron.php has a negative impact on your website.
To choose not to create a replacement task or delete the one already created by WordPress Toolkit, click the image tune icon and then turn off “Create a replacement task when takeover is initiated”.

(Optional) You may want to run wp-cron.php on a different schedule. To do so, click the image tune icon and, next to “Create a replacement task…”, click the image tune icon icon. This will open a new Plesk tab with scheduled tasks. Change the default 30-minute interval, and then save changes.

Note: The image tune icon next to “Create a replacement task…” is displayed if you have permission to manage scheduled tasks.

Note: If you removed a replacement task by mistake, you can always recreate it. To do so, click the image tune icon, turn it off, and then turn back on “Create a replacement task when the takeover is initiated”.

The Plesk administrator can disable wp-cron.php on all new WordPress installations.

Prior wp-cron.php Configurations
You may have already disabled wp-cron.php without WordPress Toolkit by using the following ways:

Editing the wp-config.php file. In this case, WordPress Toolkit will detect this change and adjust the “Take over wp-cron.php” toggle.
Creating your own replacement scheduled task. In this case, WordPress Toolkit can create another one once you turn on “Take over wp-cron.php” in the WordPress Toolkit interface. You can choose between the following options:
Keep two tasks (it will not much affect the performance).
Delete your task and keep the task created by WordPress Toolkit.
Keep your task and delete the task created by WordPress Toolkit. To do so, turn off “Create a replacement task when the takeover is initiated”.


Logging Events of WordPress Installations

If your WordPress installation does not work as expected, you can view its logs to troubleshoot the issue. WordPress Toolkit logs important events it performs on managed websites, for example:

Updating the website theme.
Applying a security measure.
Cloning a website.
Note: WordPress Toolkit version 5.5 (and higher) logs every single event it performs on a managed website. If you have WordPress Toolkit version 5.4, you’ll see only important events in the list.

WordPress Toolkit writes logs in plain text and for each individual WordPress installation.

To view logs of a WordPress installation:

Go to WordPress.

Click Logs next to the WordPress installation whose logs you want to view:

In the Logs of <site’s name> pop-up window, you can view the detailed information about logged events:

The pop-up window with the logs of the site appears. By default, the list updates only upon opening. You can also refresh the list by doing the following:

To get the latest logs once, click Refresh.

To get the list updated constantly while you’re viewing it, select the Real-time updates toggle button:

Note: When the toggle button is selected, logs are updated every five seconds. You can specify another update period in the action LogReal Time Updates Period variable in the panel.ini configuration file.

Filtering Logged Events
If you want to find particular events in the list, you can apply the following filters:

Date/time of the event.
The severity of the event. Possible values: Error, Warning, and Info.
Actor of the event. It can be either a particular user or the system itself.
The message is used to describe the event.
After you’ve applied the filters, only events that match the filter criteria will be displayed.

Log Rotation
Starting from WordPress Toolkit version 5.5, you can configure log rotation for a particular WordPress installation. By default, log rotation is enabled for all WordPress installations. However, you can disable it or configure individual settings for each of the installations. Here’s how to do it:

Go to WordPress.

Click Logs next to the required WordPress installation.

In the upper right corner of the pop-up window, click Log Rotation.

In the Log Rotation Settings pop-up window, configure the following parameters:

Enable checkbox. By default, the checkbox is selected. You can manually disable log rotation by clearing the checkbox.
Rotate by size or Rotate by time radio buttons. Select the required option and specify the maximum log size or the rotation time.
A maximum number of log files. When the number of log files reaches the specified value, WordPress Toolkit will compress the earliest uncompressed log file before creating a new one.
Disk space economy. To save disk space, select the Compress log files radio button. If you want the log files to be available at any moment, leave the checkbox cleared.
Log File Manager
In the log file manager, you can view, copy, or delete particular lines of the recorded events. WordPress Toolkit stores each log file in a separate folder and names the file according to the following pattern:

$HOME/logs/wpt_action_logs/action_log_#WEBSITE_UID#.log
where $HOME is your domain home directory and WEBSITE_UID is the website’s internal UID.

Here’s how the log editor can look:


Maintenance Mode

When a WordPress website enters maintenance mode, the website's content is hidden from visitors without being changed or otherwise affected. Visitors accessing your website when it is in maintenance mode see a maintenance screen webpage instead of the website content.

Turning on maintenance mode
Your WordPress website enters maintenance mode automatically when you are:

Upgrading your WordPress installation.
Copying data from one WordPress website to another.
If you are making changes to your website and want to temporarily hide it from visitors, you can manually put it into maintenance mode.

To put a WordPress website into maintenance mode:

Go to WordPress and choose the WordPress installation you want to put into maintenance mode.

Turn on “Maintenance mode” on the installation card.

To take your website out of maintenance mode, turn off “Maintenance mode”.

Customizing the maintenance page
Plesk WordPress Toolkit allows you to change certain attributes of the maintenance page to make it more informative. For example you can:

Change the text displayed on the maintenance page.
Add a countdown timer.
Provide or remove links to social network pages.
To customize the maintenance page:

Go to WordPress, choose the WordPress installation whose maintenance page you want to customize, and then click the image tune icon next to “Maintenance mode” on the installation card.

In the Screen Text section, you can change the text displayed. Use HTML tags to format the text’s appearance.

In the Timer section, you can set up and turn on the countdown timer that will be displayed on the maintenance page.

Note: The timer is only meant to inform visitors about the estimated duration of the remaining downtime. Your website is not taken out of maintenance when the countdown is finished; you must do that manually.

In the Social Network Links section, provide or remove links to social network pages (Facebook, Twitter, and Instagram).

Click OK.

If you have coding skills, you can customize the maintenance page beyond the options described above.

To customize the maintenance page for a particular website:

Go to WordPress, choose the WordPress installation whose maintenance page you want to customize, and then click the image tune icon next to “Maintenance mode” on the installation card.
Click Customize and edit the maintenance page template in Code Editor.
Click OK.
Restoring the Default Maintenance Page
If necessary, you can restore the default maintenance page.

To restore the default maintenance page:

Go to WordPress and choose the WordPress installation whose maintenance page you want to reset to default.
Click the image tune icon next to “Maintenance mode” on the installation card and then click Restore Default.


WordPress Core Checksum Verification
Note: The feature is supported in WordPress Toolkit version 5.6 or higher. Pay attention that it doesn’t check such files as index.php, wp-config.php, and other files that contain installation-specific data and don’t have a reference checksum.

When malicious software infects WordPress sites, it can embed itself in the WordPress .php core files. As a result, it can damage your Search Engine Optimization, illegally mine cryptocurrency, or force unauthorized redirects. The core files are not meant to be modified, so you can check their MD5 checksum against the checksum of the original core files provided by WordPress.

To verify the checksum of a WordPress installation, do the following:

Go to WordPress.

In the form of the required site, click Check WordPress Integrity.

In the pop-up window that appears, click Verify Checksums.

After WordPress Toolkit verifies the checksum, do one of the following:

  • If WordPress core files are successfully verified, click Close.

  • If some core files differ, click Reinstall WordPress Core:

After WordPress Toolkit verifies the checksum, do one of the following:

If WordPress core files are successfully verified, click Close.

If some core files differ, click Reinstall WordPress Core:

Was this answer helpful? 31 Users Found This Useful (121 Votes)